Modified on: 27/05/2024
Everything you need to know about e-cig regeneration
Have you just started vaping and want to know how to regenerate your e-cigarette atomizer? No wonder: all beginner vapers need someone to guide them through the maintenance aspects of their device.
In the following lines, I will explain what atomizer regeneration consists of, how it is done, what tools you will need to do it and how often you will need to do it.
What is the regeneration of the atomizer of the electronic cigarette?
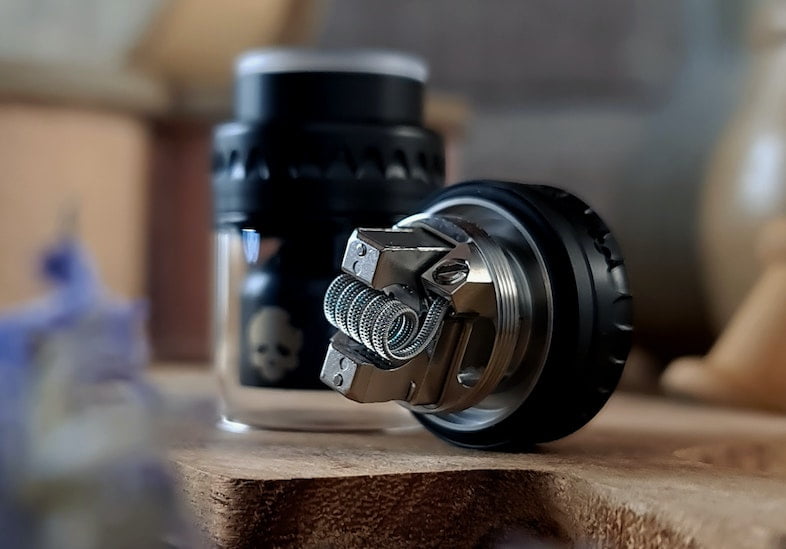
When we talk about regenerating the atomizer of the e-cig, we are referring to a normal maintenance procedure which allows you to obtain an optimal vaping experience. Of course, this only applies to rebuildable atomizers, also known as RBAs (rebuildable atomizers). Therefore, if you own such an atomizer, to have a quality vaping experience you will not only have to take care of the cleaning of this component, but you will also have to regenerate it periodically by acting on a crucial element: the resistance.
If you look closely at your tank, you will notice that the coil is attached to the base of the deck and can be removed. Here, as the coil of resistive wire and the cotton that absorbs the vaping liquids wear out over time and with use, it is necessary to make a pit stop, remove the worn components and replace them. You will soon find out what the procedure is for doing this. First, however, I want to provide you with a list of the materials you will need so that you are ready (or prepared).


What you need to regenerate your electronic cigarette
Vaping is a practice that is not limited to simply inhaling the vapours produced by fruity, creamy or tobacco liquids but includes many other operations. It is no coincidence that every self-respecting vaper has a proper kit comparable to a plumber’s or electrician’s toolbox. Fear not, to regenerate your atomizer you will not need many tools. The materials needed to make up the resistance include:
- cotton;
- resistive wire.
Regarding the wire, be aware that each e-cig model requires a certain type of resistance, so make sure you buy one of the right materials. Next, I will list the various tools you will have to make a brand-new coil and mount it in your atom:
- a wire cutter
- a pair of pliers with an oblique tip;
- a metal bar on which to wind the wire (called a coil jigger);
- a small screwdriver;
- scissors.
Once you have done your shopping, you can get to work on your first atomizer regeneration. I will now walk you through the various steps you will need to take.
Read also: Mesh resistors: what are these coils that are conquering more and more vapers?
How to make e-cigarette resistance
Assuming that you have familiarized yourself with the characteristics of your device and purchased a suitable coil of resistive wire, the first (in fact, the most important) step is to make the new coil. In this regard, it is significant for you to know how many coils your resistance will have and on what type of tip you are going to create them. The tip is nothing more than the section on which you are going to wind the wire. Depending on the diameter of your resistance, you will choose the appropriate tip using the coil jigger.
The first few times, it is advisable to cut a longer piece of wire than necessary (you don’t want to risk not being able to complete your work for half a centimetre less). Cut the wire? Well, now you just have to start winding it on the metal bar in a clockwise direction, taking care to stretch it well so that the coils are tight. Once this is done you will need to take the coil out of the jigger, place it in the deck with the ends on the two turrets and tighten the screws to secure it.
At this point, you will be halfway through the job. Yes, because inside the metal coil the cotton is still missing. Here again, you will need to put your craftsmanship to the test by first cutting a layer of cotton about 6 cm thick, and then shaping it to create a sort of whisker that can be easily placed inside the heating element. Et voilà. The game is done!
The first attempts may require some attention and time, but with practice, you will learn to regenerate your atomizer in no time.


How often do regenerate your atomizer?
As I have already told you, remanufacturing becomes necessary when coil wear starts to affect the vape negatively. Experienced vapers notice a resistance that starts to fail while vaping, but you who are just starting may not have developed this sensitivity. Therefore, you are probably wondering how often you need to regenerate the coil.
The answer can only be approximate. In some cases, every fortnight, in others three. It depends on factors such as the wire materials, the liquids used and the frequency of vaping. And then, of course, the life of the coil is also impacted by the frequency and quality of its maintenance. If you don’t regularly remove the debris and impurities that form on the coil with a wash or dry burn, the resistance will be ruined sooner, and you will be forced to regenerate the atom much more typically.
Read also: Debunking the most embarrassing e-cigarette hoaxes
In conclusion
In this article, I have given you some tips so that you can take your first steps in regenerating the atomizer of your e-cig. This operation, like others, is critical if you want to have a top vaping experience. Of course, an equally important element is the quality of the liquids.
If you are looking for e-cigarette liquids that make your vaping an unforgettable sensory experience, visit the Terpy.shop. In our online store, you will find a wide selection of vaping products to suit all tastes.


